Exploring Quantum Machine Learning with Python: Fundamentals and Applications
Machine learning is an essential branch of artificial intelligence that has made significant strides in recent years. Traditional machine learning methods, on the other hand, have constraints. Quantum machine learning, a hybrid of quantum computing and machine learning, has surfaced as a potential answer to some of conventional machine learning’s limitations.
Python is a common machine-learning language that can also be used for quantum machine learning. In this article, we will look at how to use Python to implement quantum machine learning algorithms.
Quantum Computing Environment
Before we can begin with quantum machine learning, we must first create a quantum computing environment. There are several quantum computing frameworks available, but we will use the Qiskit framework in this article. Qiskit is an open-source quantum computing framework that provides tools for developing and running quantum circuits on real-world quantum devices and simulators.
To install Qiskit, we can use the pip package manager:
!pip install qiskitOnce Qiskit is installed, we can start with the implementation of quantum machine learning algorithms.
Quantum Support Vector Machine (QSVM)
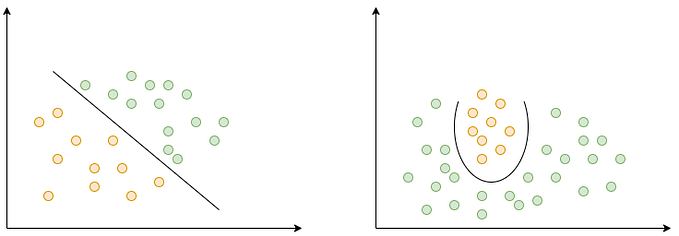
The quantum support vector machine (QSVM) is a classification-based quantum machine learning approach. The QSVM method is a modification of the traditional support vector machine (SVM) algorithm. The main difference between classical SVM and QSVM is that QSVM employs quantum computing to tackle the optimization issue inherent in the SVM algorithm.
The QSVM algorithm can be formulated as follows:
Given a training dataset of N data points, {x_i, y_i} where x_i is a d-dimensional feature vector and y_i is its corresponding binary label, the objective of QSVM is to find a hyperplane in the d-dimensional feature space that maximally separates the two classes. In particular, we want to find the optimal weight vector w and bias b that satisfy:
minimize (1/2)||w||² + C * sum(max(0, 1 — y_i (w . x_i + b)))
where C is a hyperparameter that controls the trade-off between the margin and the number of misclassifications, and ||w||² represents the squared Euclidean norm of the weight vector.
To implement the QSVM algorithm on a quantum computer, the classical data points {x_i, y_i} are first encoded as quantum states. The algorithm then uses a quantum kernel function to compute the inner products of the quantum states. Finally, a quantum version of the classical support vector machine algorithm is applied to the inner products to obtain the optimal weight vector and bias.
The exact form of the quantum kernel function depends on the specific QSVM implementation. One common choice is the quantum Fourier transform (QFT) kernel, which can be written as:
K(x_i, x_j) = sum_k exp(-2piix_i,kx_j,k)
where x_i,k and x_j,k are the k-th components of the feature vectors x_i and x_j, respectively, and i is the imaginary unit. Other quantum kernel functions, such as the amplitude estimation-based kernel, have also been proposed and studied in the literature.
To implement QSVM using Qiskit, we need to import the necessary libraries:
from qiskit import Aer
from qiskit.utils import QuantumInstance
from qiskit.aqua.algorithms import QSVM
from qiskit.aqua.components.multiclass_extensions import AllPairs
Next, we need to define the dataset that we want to use for classification. In this example, we will use the iris dataset:
from sklearn.datasets import load_iris
iris = load_iris()
We can now split the dataset into training and testing sets:
from sklearn.model_selection import train_test_split
x_train, x_test, y_train, y_test = train_test_split(iris.data, iris.target, test_size=0.3, random_state=0)
Next, we need to create a QSVM instance and set its parameters:
qsvm = QSVM(feature_map=None, training_dataset={'A': x_train[y_train==0], 'B': x_train[y_train==1], 'C': x_train[y_train==2]}, test_dataset={'A': x_test[y_test==0], 'B': x_test[y_test==1], 'C': x_test[y_test==2]}, multiclass_extension=AllPairs())
backend = Aer.get_backend('qasm_simulator')
quantum_instance = QuantumInstance(backend, shots=1024)
The AllPairs multiclass extension is used in the code above to expand QSVM for multi-class classification. We’re also changing the backend to qasm simulator and increasing the number of shots to 1024. The amount of shots decides how many times the quantum circuit is run.
Finally, we can run the QSVM algorithm:
result = qsvm.run(quantum_instance)Quantum Neural Networks (QNN)
Another area of quantum machine learning is quantum neural networks (QNNs). QNNs are similar to classical neural networks, but they use quantum gates instead of classical gates. QNNs have the potential to perform certain tasks more efficiently than classical neural networks.
The equation for a basic Quantum Neural Network (QNN) can be written in a more simplified form as follows:
Input Encoding: Encode x as quantum state |x⟩
Layer 1: $U_1 = e^{-i\theta_1 H_1}$, where H_1 is a Hermitian operator
Layer 2: $U_2 = e^{-i\theta_2 H_2}$, where H_2 is a Hermitian operator
…
Layer L: $U_L = e^{-i\theta_L H_L}$, where H_L is a Hermitian operator
Measurement: Measure qubits to obtain output y
In this equation, the input encoding step involves mapping the classical input data x to a quantum state |x⟩. The following L layers each consist of a unitary transformation $U_l$ that is applied to the quantum state, where $\theta_l$ are the parameters that are optimized during training, and $H_l$ is a Hermitian operator that acts on the quantum state. The final step involves measuring the qubits of the quantum state to obtain the output y.
Note that the specific form of the Hermitian operators $H_l$ and the unitary transformations $U_l$ depend on the specific QNN architecture and the task at hand. For example, in a QNN designed for classification tasks, the final measurement step might involve measuring the qubits in a way that corresponds to the different output classes.
To implement QNNs using Qiskit, we need to import the necessary libraries:
from qiskit import QuantumCircuit, ClassicalRegister, QuantumRegister
from qiskit.circuit.library import TwoLocal
from qiskit_machine_learning.neural_networks import CircuitQNN
Next, we need to define the dataset that we want to use. In this example, we will use the Breast Cancer Wisconsin dataset:
from sklearn.datasets import load_breast_cancer
data = load_breast_cancer()
We can now split the dataset into training and testing sets:
from sklearn.model_selection import train_test_split
x_train, x_test, y_train, y_test = train_test_split(data.data, data.target, test_size=0.3, random_state=0)
Next, we need to create a quantum circuit that will be used as the feature map for the QNN. We can use the TwoLocal circuit from Qiskit's circuit library:
num_qubits = x_train.shape[1]
feature_map = TwoLocal(num_qubits, ['ry', 'rz'], 'cz', reps=3)
We can now create a QNN instance and set its parameters:
qnn = CircuitQNN(feature_map=feature_map, var_form=feature_map, readout=[0])
backend = Aer.get_backend('qasm_simulator')
quantum_instance = QuantumInstance(backend, shots=1024)
In the code above, we are using the same feature_map circuit as the variational form. We are also setting the backend to the qasm_simulator and the number of shots to 1024.
Finally, we can train the QNN on the training dataset:
qnn.fit(x_train, y_train, quantum_instance=quantum_instance)After training, we can evaluate the QNN on the testing dataset:
score = qnn.score(x_test, y_test, quantum_instance=quantum_instance)Finally, at the intersection of quantum computing and machine learning, quantum machine learning is a fascinating and quickly expanding area. Python is a powerful and widely used computer language that offers an ideal framework for creating and testing quantum machine learning methods.
We’ve talked about the basic ideas of quantum computing and machine learning, as well as the important methods and algorithms used in quantum machine learning, such as quantum algorithms for supervised and unsupervised learning, quantum support vector machines, and quantum neural networks. We also looked into some of the Python tools and frameworks that can be used to develop and evaluate quantum machine learning algorithms, such as Qiskit.
Quantum machine learning has the ability to transform industries ranging from banking and healthcare to production and transportation. Quantum machine learning methods, for example, can be used to improve supply chain management, create novel materials with particular properties, and better medical diagnoses and treatments.
Thank you for taking the time to read this article on quantum machine learning. I hope you found it informative and useful. If you have any questions or feedback, please don’t hesitate to reach out. Thanks again for your interest in this exciting field!


